GateDetector Demo Kit
Gate Detector is a BlueUp proprietary application developed to be able to detect and monitor the transits of a beacon through an entrance or exit point, referred to as Gate.
Gate Detector provides real-time information and data about the transits of people or assets, provided with a beacon, through a gate, distinguishing between entrance or exit.
The main components of the Gate Detector are:
- BLE Antennas: fixed devices that are used to detect the transits through a Gate. For each gate 2 Antennas are needed;
- Tags: mobile devices, applied to assets or worn by people, used for transit detection. The tags must be configured with Safety Beaconing enabled;
- Gate Detector software: can be installed on a physical or on a virtual machine, and can be integrated using APIs.

Demo Kit Hardware components
In the table below are listed the Hardware Components that are included in the MeshCube Demo Kit.
| Device | Quantity | Image |
|---|---|---|
| MeshCube Server with Power Supply Unit and 1-year license | 1 |  |
| BLE Antennas | 2 |  |
| Tags among the available models | 1 - 9 |  |
Prerequisites
Prerequisites for using MeshCube Demo Kit are:
- LAN (Local Area Network). Your LAN should be provided with DHCP server to be able to retrieve the MeshCube Server IP address.
- A PC/Laptop with LAN (or WLAN) interface and web browser (Google Chrome is suggested).
Setup
The following steps describe the complete setup of the GateDetector Demo Kit. Please follow each step as suggested.
Step 1: Setup of LAN connection
- Power-up GateDetector Server using provided Power Supply Unit (PSU) and connect it to your LAN.
- Power-up the BLE Antennas using provided PSU and connect them to your LAN
- Connect PC/Laptop to your LAN.
- Find the local IP address of the GateDetector Server. On your router interface MeshCube Server is listed with hostname gatedetector-XXXXXX, where XXXXXX is a number.

Step 2: Gate Setup
This step describes how to setup and configure the Gate.
-
Install the BLE Antennas above a Gate, with the Antennas installed back-to-back to each other.

-
On your PC/Laptop connected to the LAN, using the web browser, open local IP of the Gate Detector Server.
-
Login the Gate Detector web interface using default password blueup.

-
Go to the Gateways section. The first time, the gateways list will be empty. Click on “+” icon on the right and select “scan the Network”.

-
The BLE Antennas found in the network will be listed (you should see only 2 Gateways). Select the Antennas and press OK.

-
After a few seconds the Antennas will be listed in “GW01 Gateways” section.

-
Go to the Gates section. Use the “+” button in the right corner to define a new Gate.

-
When defining a new gate, the user has to specify the Gate identifier and description, In and Out Gateways and the configuration parameters.
 The suggested configuration parameters to use are:
- Anchor detection timeout = 10 sec;
- Anchor max async = 1000 ms;
- Trigger ΔdB = 6 dB;
- Trigger range threshold= -10 dB;
- Out of range threshold = -20 dB;
- RSSI filter = Kalman RSSI Filter; Process Noise = 0.3; Measurement Noise = 5.
Step 3: Transits tracking
- After Step 2, the system is ready to be used.
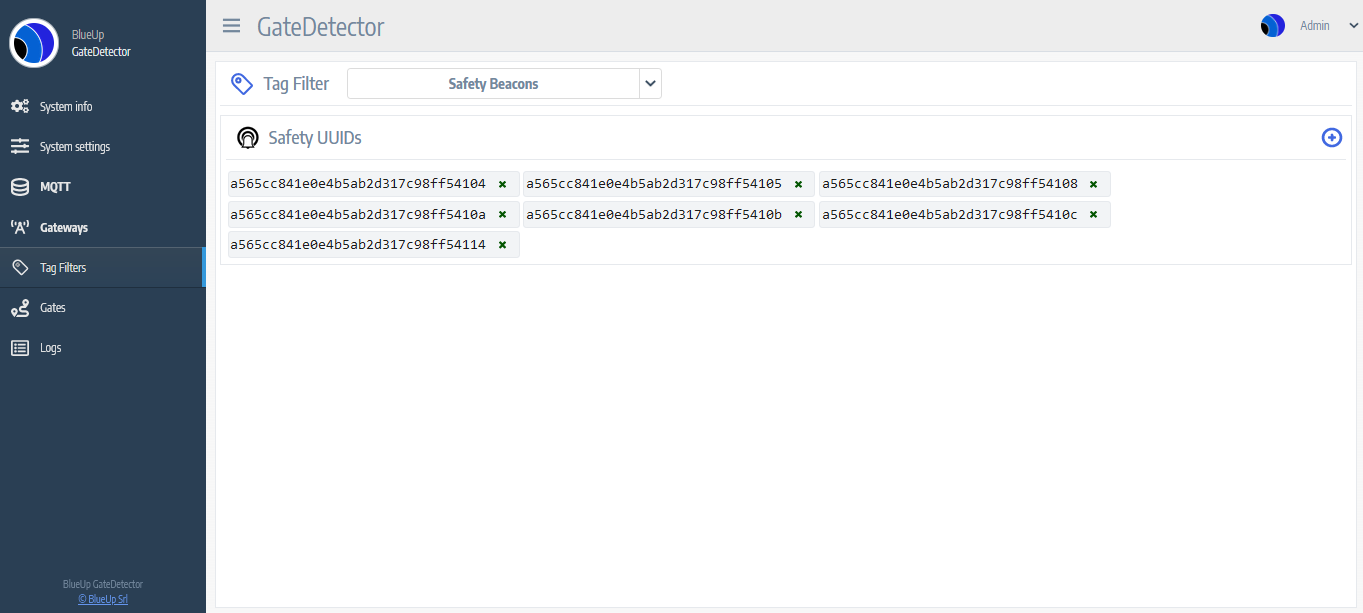
- In Tag Filters are already specified all the possible Safety UUIDs that the system can detect. In case you asked for a custom UUID beacon, eliminate all the default UUIDs and add your UUID filter by pressing “+” button.
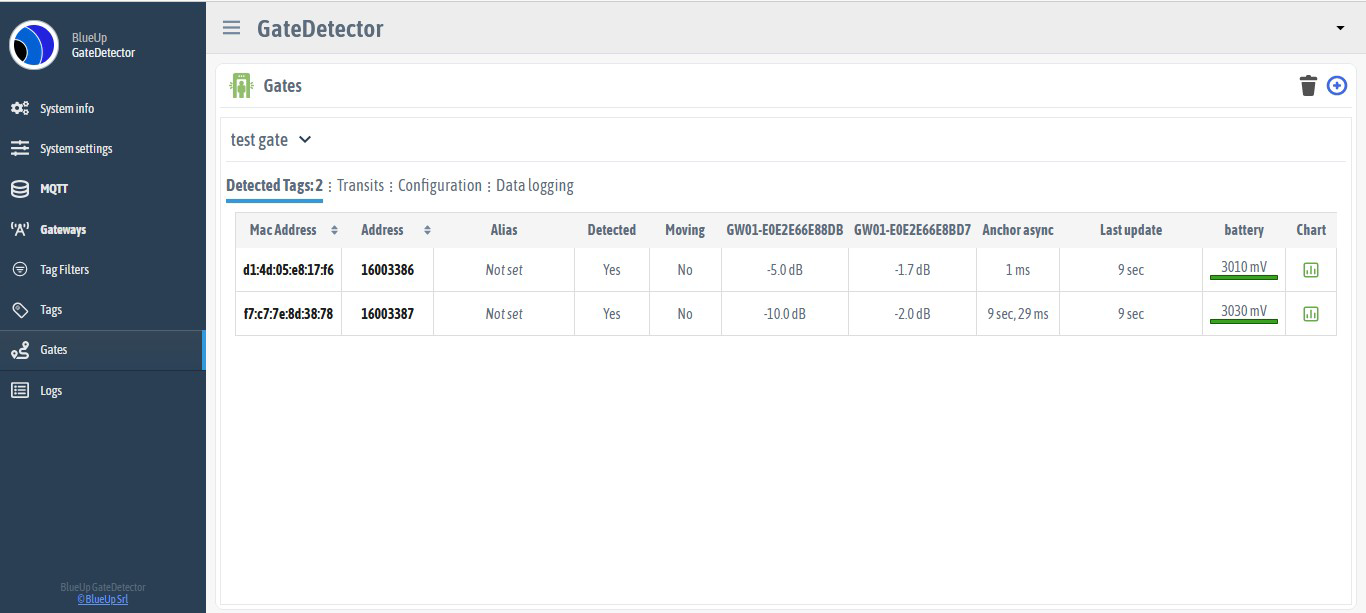
- In Gates section in the Detected Tags are listed all the tags in the network that fulfill the Tag Filter described before.
- In the Transits section are listed all the detected tag transits, specifying whether it was an In or an Out transit and with what RSSI values.
